Friday, April 24, 2015

Home and Cellar Take Shape

Connor’s parents had planned to visit and help us pour the concrete walls of the storm shelter, so it was essential we finish fixing the hole and installing the forms before they came. While Connor worked on widening the hole, I extended the two longer outside forms by 16 inches. The next day we continued chopping the rock and clay and hauling it out of the hole, finally coming to our senses and utilizing the tractor’s loader instead of the wheelbarrow. Nine hours later and a hole almost twice the size, we finished our digging. Screwing in the forms proved a metric ton easier when there was room to walk around them. The next morning Connor cut all of the rebar and pounded them in between the two forms, and just as we were topping them all with bottles and jars (to prevent impalement) John and Maureen drove up the driveway.  

Connor widening the hole
Leveling footings
Forms and rebar finally installed and ready for cement
Our friend Brian from town once again came to our rescue and lent us his electric concrete mixer so we didn’t have to mix by hand in the wheelbarrow. The mixer didn’t have wheels so we propped it up on a quickly made table of plywood and sawhorses outside of the pole shed. Maureen and I mastered the task of tossing in perfect ratios of sand, cement, and rock, while the boys hauled wheelbarrows of the mixed concrete into the shed to dump between the forms. The gusting wind whipped cement and sand into our eyes and, well, every exposed pore we had.


An impressive set-up of ramps and walk-ways 
All appeared to being going smoothly as we gradually picked up our work pace, until we gathered around the half-done cellar and realized what we’d missed. Connor and I hadn’t had time to mix and pour a little concrete the night before to have a hardened base for the walls, and because of this the forms were bending under the immense pressure of the concrete. The added 16 inches of form were our weak points and had already begun buckling at the base. John sprung into action, adding braces around the outside forms to keep them from sliding any further.
We continued mixing and pouring, this time at a slower pace, and as the wind picked up and rain began to fall, we finished the concrete walls. Never mind that one wall is a little thicker than the opposite, and the ventilation pipes are a little crooked; in a storm we’ll be safe and the rest of the time it’ll act as a handy little root cellar.


To complete the footings of our home each footing would need to have a cinder block and an anchor.  My Dad and Mom had these supplies at home and when they arrived on Saturday afternoon we rushed to the building site, hoping to beat the rain.  We did not beat the rain.  Each footing had a cinder block centered on the rebar loop sticking out of the concrete.  Next a metal anchor (a hook on one end and a nut and bolt on the other) was hooked onto the rebar and concrete was used to fill in the block and hold the anchor in place.  Once this was done we retreated inside to a warm and dry fire.  


The following day, while taking a break from pouring the shelter, we cut small rectangles of treated 2X8 lumber and drilled a single hole in each big enough to fit the anchor. Each footing now had a cinder block and a treated piece of lumber bolted to the top. Finally our footings were complete and at long last we moved the frame of our floor to sit on the beams. All we have left is to attach our 12-foot beams to the treated 2X8’s, and attach the floor joists to the beams with L-shaped connectors. It feels great to begin assembling everything, and to be that much closer to the finish.

Removing the wooden forms


The foundation of our home, porch and all
On Tuesday we began our tree-planting job by organizing, tagging, and preparing fruit tree saplings for sale.   We worked in a large tree cooler that stays at a chilly 38 degrees, dipping each of tree’s roots in a root gel and bagging them with shingle toe (cedar shaving) in order to keep in the moisture.  At the end of our six-hour day we decided to take our pay in fruit trees! (Because we’re foresters and why not, right?) We took home two pear trees, two apple trees, and a couple of rhubarb plants.  Now we have our own little orchard that will hopefully produce fruit for the many years to come.  On Thursday we began our first day of actual tree planting.  Claire and I sat on the back of a planter (which is hooked up to an old tractor) and placed hundreds of trees into the churned up earth.


Connor driving the tractor and attached planter


Thursday, April 16, 2015

Measure twice, measure right

On Easter weekend Claire and I drove south to Lincoln Nebraska to visit my Aunt and Uncle.  When we arrived we were greeted with good food, games, conversation, and a shower!  On top of this there were eight dogs, including my aunt and uncles new puppy, Buca.  For two day we played, ate, and visited with family.  The following week honestly consisted of only two things:  A tree planting workshop with a tour of the Big Sioux Nursery, and digging.  The workshop was for our upcoming job with the conservation district and we learned many things about how and when to plant different species of trees.  We also learned that we would be planting primarily windbreaks and shelterbelts.  The tour of the nursery was equally fascinating.  Here we saw the large refrigerators where seedlings were stored, rows of workers packing dozens of seedlings in special waxed boxes, and a tractor and crew digging up two year old lilac.  The other four days of the week we spent inside the pole shed extending our hole for the storm shelter.    
 
The Smith family and their dogs!!
Last weekend my friend Tessa drove out to Clark to visit Connor and me, bringing with her good food, company, and an exterior door! We are thrilled, and want to extend a hearty thank you to Tessa and her mom for giving it to us. Tessa helped us outline and dig up our first spring garden bed, a 3’ wide by 15’ long raised bed next to the pole shed. We chopped through the grass and tilled the topsoil with shovels, then piled on more topsoil to raise the bed a few inches off the ground. Theoretically, the raised bed will ensure minimal compaction on the plant roots and provide plenty of air pockets for water. We brought out our bucket of seed packets and went to town sowing rows of spinach, kale, garlic, red lettuce, and arugula. With consistent high winds and sunny days, the soil dries out freakishly fast, despite watering 2-3 times a day. We are considering temporary grass mulches to help keep the moisture high. Days to germination are stressful.
We gave Tessa a tour of the pole shed and our projects, then jumped right in to cutting and screwing together the concrete forms for our storm shelter. We finished two before realizing we’d need more 2x4s and screws for the rest. You’d think we’d have learned to over-purchase supplies by now.
We finally convinced the chickens to eat food from our hands, and they waddled to and from each of us to peck into our cupped fingers. Thank you for visiting us, Tessa! We hope to see you again. 


Digging the hole for the storm shelter has not been easy or enjoyable.  In order to fit our cement forms we needed to dig a 5X9X5 foot hole.  To our dismay, much of the dirt was rock or clay.  We realized early on that when both of us were in the hole digging we were more likely to shower each other with dirt than throw it out of the hole. Thus, I dug and piled dirt on the floor of the pole shed while Claire wheel-barrowed it outside. At long last we completed our hole and were ready to start assembling our forms.  Our end goal is to have a concrete shelter that is four feet wide, six feet long, and four feet tall, with six inch concrete walls. After several days of work and preparation, all eight of our forms were built, sixteen 100 pound bags of Portland cement sat in our pole shed, 200 feet of rebar lay on the ground, and large piles of rock and sand were mounded outside the door.  We were enthusiastic and ready to set the forms and pour the concrete when disaster struck.  As we finished screwing the outside forms together in the hole we realized that our numbers were off and with the current forms the walls would only be one and a half inches thick. Nooo! Not only do we have to lengthen two forms by 16 inches but we also need to extend the hole to fit the new dimensions.  Thus, even though we expected to have the shelter completed by the end of the upcoming weekend, we will most likely not finish until the following weekend. We hope that by our next post we can have pictures of the forms, rebar, walls, and even the roof, so cross your fingers!       
           

Our too small outside wall forms:(

Much to our alarm and confusion, our four chickens just stopped laying eggs one day. The next day there were feathers all over the coop and run, and the chickies seemed to enjoy sitting around more than foraging. Odd. This went on for a week before we thumbed through our chicken book, finding all of the horrible illnesses and injuries that chickens can pick up and trying to match our chickens’ symptoms to the ones listed. Then we read about molting. As far as we knew chickens usually molted in the fall, but for some reason ours were in the spring. It meant feathers in the coop, feathers in the water fount, feathers mixed with poop, and no eggs for up to two months. It's a natural process, but all the same we were almost embarrassed to have to go to the store to buy eggs.


On a very bright note, one of our indoor pea plants produced a pea!!! One glorious, beautiful, green, pea!!

Friday, April 3, 2015

Six Days of Wall Frames

Days 1-2:
We tackled the wall frames by beginning with the one-windowed 16’x8’ back wall, the least complicated of the four. All of the boards were measured, marked, and cut into different sized pieces late one day, and the following morning Connor and I marched out the shed to assemble them. Months ago as we were planning and dreaming of our home, building the wall frames was what I always thought of, the epitome of the construction process, the skeleton of the home. We studied timeworn do-it-yourself construction books and manuals that we’d found collecting dust in our parents’ bookshelves, hoping that by doing so the week would go as smoothly as possible. From these books we learned that to create an 8-foot wall our 2x4s needed to be 92 ¼ inches. Maybe that is obvious, but it was something we hadn’t even considered – we just assumed an 8-foot wall would have 8-foot 2x4s.
We created our 16’ long top and sole plates by nailing blocks of wood over the joints of two 8’ long studs and in a 4’, 8’, 4’ combination so that all joints were offset. With our 16 on centers marked, we began the first corner, comprised of two studs with filler blocks between them. Moral was high and all went as smoothly as we’d hoped until we hit the window opening. The rough opening itself had already caused us some distress because we’d bought the window used, and there was no indication of the manufacturer’s rough opening requirements. After combing the books, we settled on an additional 3/8th inch on all sides. But for the trim, sill, header, and cripples, we discovered that even a difference of 1/32nd of an inch determined whether a board was too loose or just snug. There was no disappointment greater than carefully making a cut, then unrolling the tape measure and finding that the board was 1/8th too short. Thus we learned to “shave”, using the table saw to cut each board a tiny bit too long, then slicing off 1/32nd to 1/16th an inch at a time until it was the exact size we needed. It was painstaking and slow, but fewer boards were wasted and bit by bit we improved our accuracy on the initial cut. With the window completed and the last of the studs nailed, we lifted the top of the heavy frame so it was standing on the floor. Oh you beauty! Now what to do with you? The frame was too heavy for us to carry, so we lowered it to the sandy ground and slid it upright across the shed until there was a space large enough to lay it on a few boards.


Days 3-5:
The second wall frame took us three days to finish. This one is 16’ long x 10’ tall with two window openings, a door opening, and three times as many trim, sills, headers, and cripples. The relative enormity scared us to bits. Our worries were affirmed when we reached the door opening. The trim was nailed and we were nailing both ends of the header into the king studs at the same time. The blows of the two conflicting hammers crooked the boards, creating an unmistakable gap between the trim and header as we hammered on in oblivion. Our nails were good and buried before we noticed. It was a careless, avoidable mistake.  
Connor labored with hammer and drill for 20 minutes fighting to get the nails out. We hacked at the header until it split, freeing it of the nails, trim, and king studs. The header was ruined, we were cross with each other, and we weren’t halfway done with the frame. Connor built a new header, I cut cripples. With the new header nailed in place, we began laying them out. In a matter of a few minutes, we lost the bit to the screwdriver, pulled out a dozen bent nails, destroyed another board, and completely lost our composure. We were done for the day.
The following day we happily ignored the mess of the door cripples and moved on to the last window. Halfway through we ran out of nails. An excuse to drive into town? Well sure! It was cloudless, warm, and beautiful, and as those things go sometimes, we quite forgot to return to our wall frame after returning.
On day five we finished the window, corner, and lastly the dreaded door cripples. This frame was, expectedly, even heavier than the last, and taller than either of us had imagined. We slid it across the floor, Connor pulling and I pushing, both of us grunting, the frame creaking, until it lay on top of the first.


Day 6:
Only the two slanted 8-foot wall frames remained. Following previous advice, we built an 8’x8’ frame with a 10’ 2x4 on one corner, leaving the triangle for later. The windows are non-opening sash, and the two shortest walls were methodically constructed with almost no nail bending, wood destroying, or cursing to ruin the mood. Our skeleton was almost complete.


Finally, a photo of our windows! 
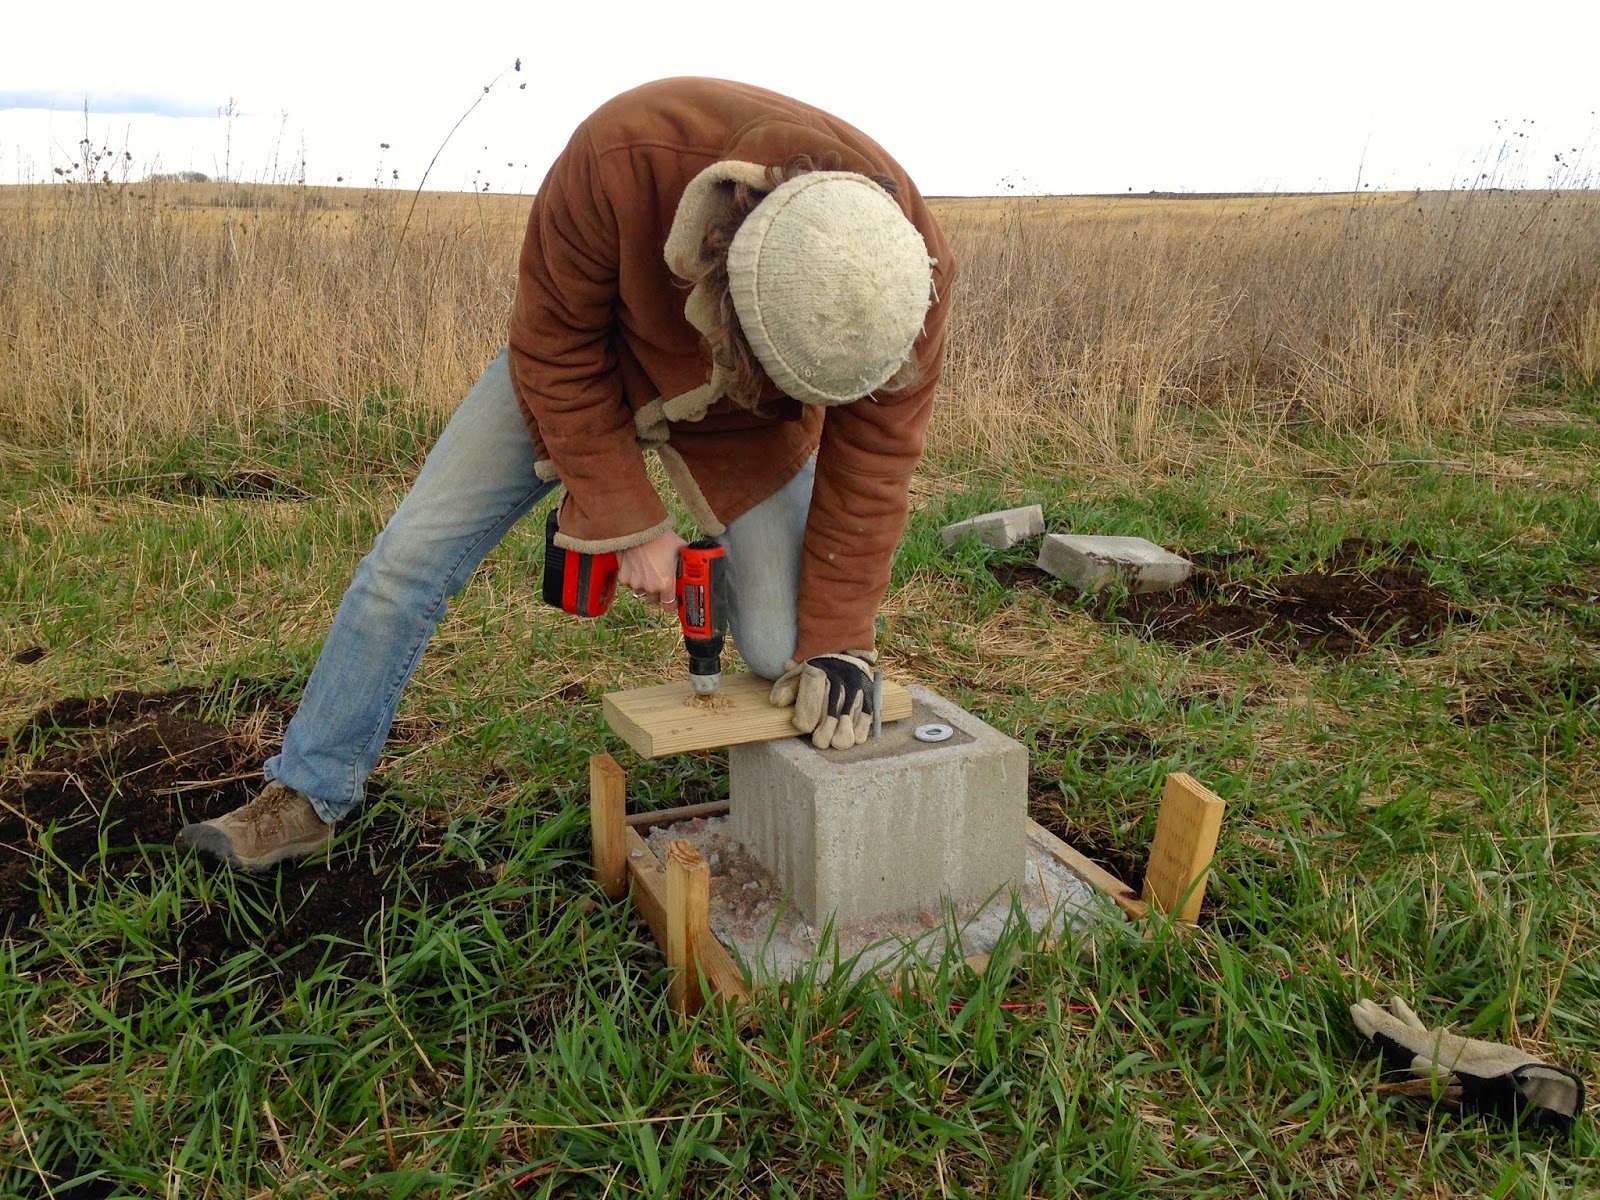
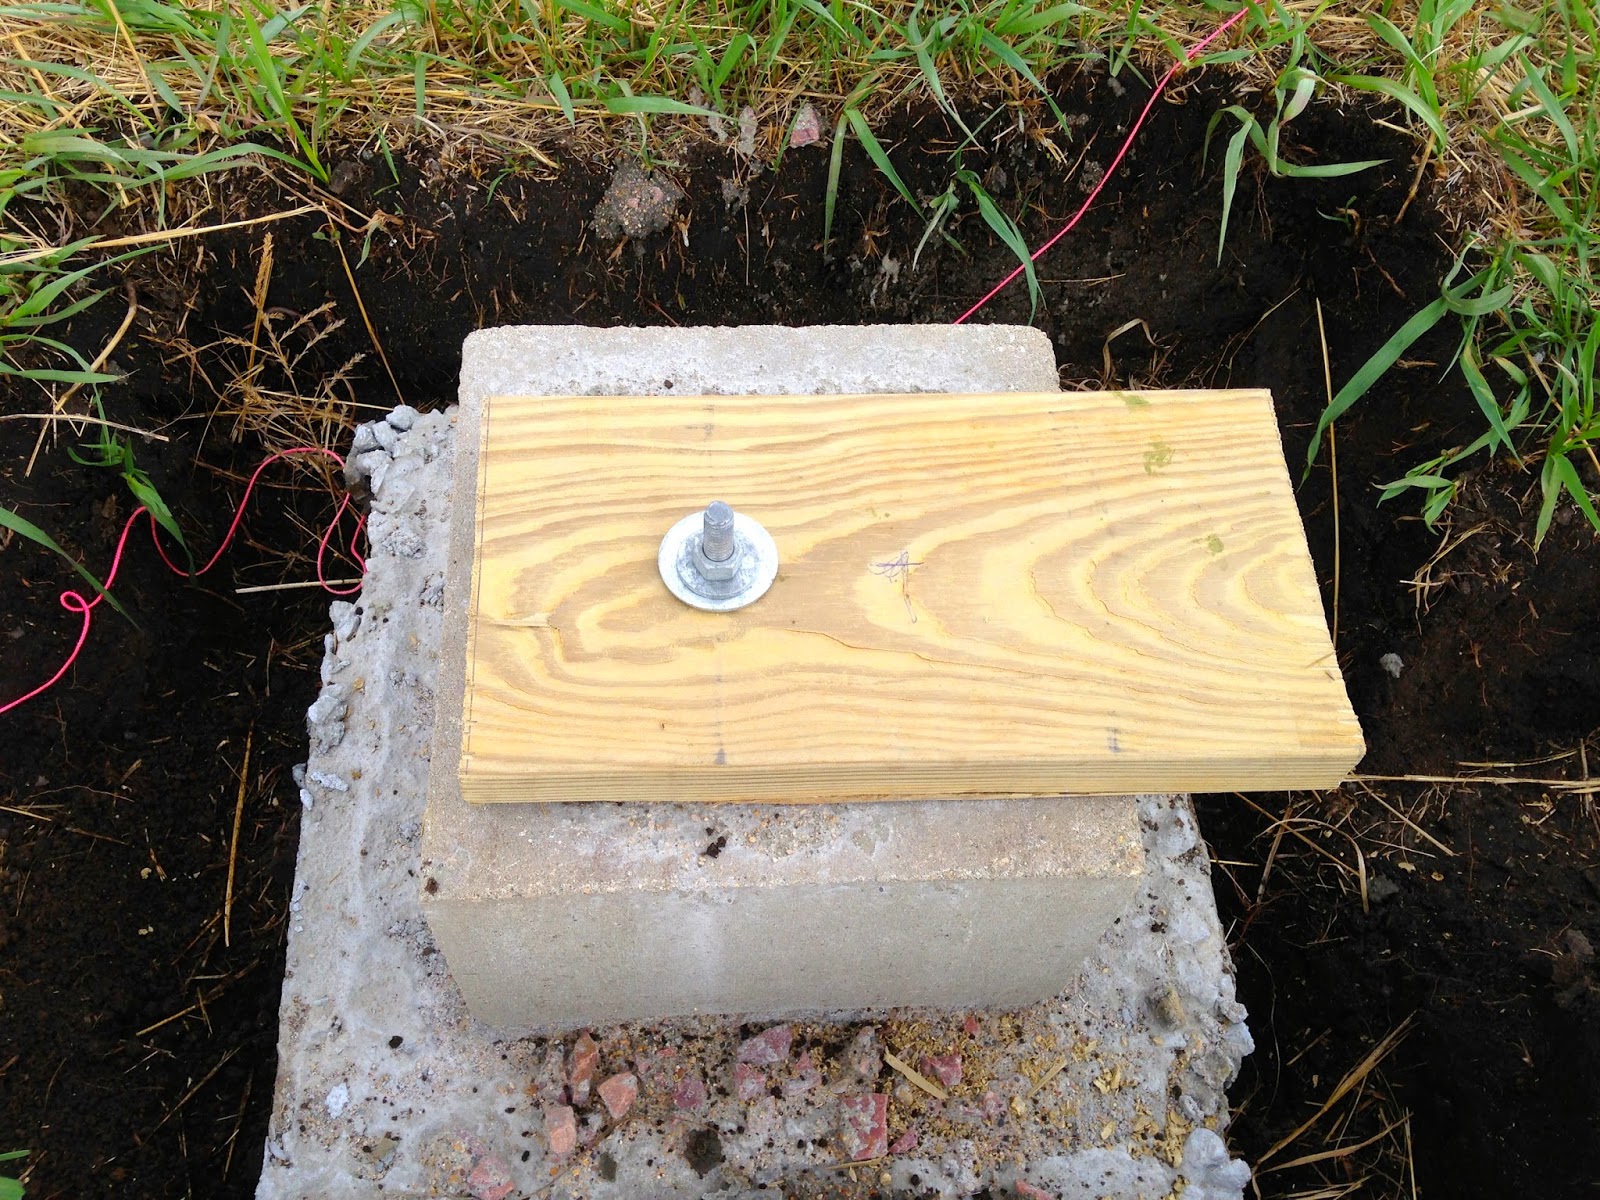
Beam Construction:
Originally we did not have enough money to both build a house and buy a trailer.  So, we needed a way to secure the house to the ground.  We began by building and laying concrete footings but the next pressing question was where do we go from there?  At first we thought bolting the floor joists to the footings directly was the way to go.  However, after some consideration we decided that we would build three beams, bolt the beams to the footings, and finally bolt the joists to beams.  This way the house would be raised off the ground by over a foot, which would hopefully help with flooding and varmints.  We chose treated 2X8’s to construct our three, twelve-foot beams.  Each beam consisted of three eight-foot boards and three four-foot boards, offset to ensure support.  We ran out of nails after the first beam so we stopped and intend to finish where we started the following week.


Digging Holes:
There has never been a storm shelter at the cabin and we figured if we were going to be living there “long term” we would need something to keep us safe from the large, terrifying storms that roll over the prairie.  So, we have begun to take a crack at storm shelter construction.  More details on this later but for now let’s just say we’ve been digging, frantically.    


Mailbox upgrade:
The winds blast and race across the prairie, teasing and poking at our mailbox until they finally slap it to the ground. We had thought the extra concrete we poured into the bucket would stabilize it, but the truth is our mailbox never stood a chance. Fed up with up righting it every hour, we were faced with two choices: saw off the post from the concrete, elongate it and dig a hole to plunge it in, which would definitely work, or pile rocks around the bucket, which might work. Rocks first. So far the winds nudge and howl but haven’t been able to budge the structure, and we have the added bonus of a very aesthetically pleasing mailbox!


Nature Watch: this is what we've spotted so far!
Killdeer, redwing blackbirds, grackles, chipping sparrows, assorted ducks and canada geese, northern harrier hawk, red tailed hawk, barred owl, roosters, common cranes, and chorus frogs.